CS-Lab Support Forum for CNC Community
Help to run this brand-new forum and stay with us.
Ask your questions, we are here to help!
New Machine Build
Quote from Jugster on 26 January 2023, 02:18Hello to everyone!!! I am in the process of building my fourth machine. I am delighted to see the new support forum, and hope to share information here that might make it easier for others. I plan on putting information on my current setup, including some basic wiring diagrams. Some basic information on the machine build are as follows:
- Mr-J2s Mitsubishi Drives
- CSMIO/IP-A Controller
- Simcnc
Currently I am mostly complete in the wiring process, and am just now working on axis setup. Previous machines were setup as Step/Dir Control. One with steppers, the other with servos. I am realizing now this control system to me is much more complicated than what I was accustomed too. Probably because its an entirely different setup. Mitsubishi drives are great, but wow do they have a lot of parameters. So I am going to ask a really simple question and hope someone can enlighten me. The motors that I am currently using have 131072 pulses/rev. However the encoder output pulse/rev is also configurable. Since the the controller is monitoring the encoder pulse, I would assume that this would be the value to monitor. Currently at 4096 pulse/rev. The electronic gearing parameters are not valid in speed mode of the drives. I have been able to mildly start tuning, but not quite there yet. So should our setup be by motor pulse/rev or encoder pulse/rev? I am already contemplating going back to a step/dir control system. Any help that can be provided would be greatly appreciated.
Hello to everyone!!! I am in the process of building my fourth machine. I am delighted to see the new support forum, and hope to share information here that might make it easier for others. I plan on putting information on my current setup, including some basic wiring diagrams. Some basic information on the machine build are as follows:
- Mr-J2s Mitsubishi Drives
- CSMIO/IP-A Controller
- Simcnc
Currently I am mostly complete in the wiring process, and am just now working on axis setup. Previous machines were setup as Step/Dir Control. One with steppers, the other with servos. I am realizing now this control system to me is much more complicated than what I was accustomed too. Probably because its an entirely different setup. Mitsubishi drives are great, but wow do they have a lot of parameters. So I am going to ask a really simple question and hope someone can enlighten me. The motors that I am currently using have 131072 pulses/rev. However the encoder output pulse/rev is also configurable. Since the the controller is monitoring the encoder pulse, I would assume that this would be the value to monitor. Currently at 4096 pulse/rev. The electronic gearing parameters are not valid in speed mode of the drives. I have been able to mildly start tuning, but not quite there yet. So should our setup be by motor pulse/rev or encoder pulse/rev? I am already contemplating going back to a step/dir control system. Any help that can be provided would be greatly appreciated.
Quote from CS-Lab Support on 27 January 2023, 13:39Servo drives have two electronic gears:
- for step/dir input
This gearing is important and only works when a servo drive is in position mode.
- for encoder output.
This gear always works, i.e., when the servo drive is in position, velocity and torque mode.CSMIO/IP-A likes the high resolution of the encoder signal.
In the case of Mach3, the recommended number of pulses per one revolution of a servomotor is 10,000 (including all edges).
In the case of simCNC, a servomotor's recommended number of pulses per revolution is as much as 40,000 or even more (including all edges).SimCNC's greater appetite for the number of pulses of the encoder signal results from its PID position regulators being twice as fast as for Mach3.
Twice as fast position PID regulator plus velocity and acceleration feedforward provide much more precise servo control.
For all this to make sense, servo drives must be correctly tuned (they must work stably and at the same time make the slightest speed error - speed deviation).Running a machine equipped with CSMIO/IP-A is only a bit more difficult than a machine equipped with CSMIO/IP-S or CSMIO/IP-M.
The greater difficulty comes only from the greater number of connections (each encoder has 8 wires), the rest of the activities (e.g. configuration) are almost identical.
To have the CSMIO/IP-A running smoothly, you must act schematically, i.e. perform the activities in the right order.
This is because the CSMIO/IP-A works in a closed loop, it is a positional loop. When the position loop is open, i.e. the PID regulator is not tuned or the +/-10V signal or encoder signal is not connected, the servo drive is not controlled. In this situation, the servo drive can move at a low speed (creep).Follow the procedure below and you will be a happy owner of a machine equipped with CSMIO/IP-A
1) Connect and configure E-stop signal.
2) Connect and configure the limit switches of all axes.
3) Connect all signals:
- DriveEnable
- Drive Fault (I always use the Servo Ready signal on the drive side because it clearly indicates whether the drive is ready for operation).
- Drive Reset
- encoder
- +/-10VDrive Enable, Drive Fault, Drive Reset signals must also be set in simCNC MotinKit settings.
4) Check if the velocity and current loop in the servo drive are properly configured.
5) Check if the drive is configured to work with +/-10V signal.
The configuration should be such that at about +/-6V the drive reaches nominal speed.
The remaining 4V is for driving the drive (overloading the drive), it's normal and you can't be afraid of it.
6) If you are using a servo encoder output, check if it's set (if it is active and that the gear is electronically correctly set).SimCNC likes a very high-resolution encoder signal.
The optimal value is 40,000 (counting the top 4 edges) pulses per 1 revolution of a servo drive.Attention!
Only one servo drive for which the position PID loop has not been configured in the CSMIO/IP-A can be connected to the CSMIO/IP-A controller at a given momentIn the case of +/-10V analog control, there is such a thing as analog signal offset.
This offset causes a servo drive for which the position PID loop is not configured in simCNC (actually in CSMIO/IP-A) will creep (slow, uncontrolled movement).
If you connected all the servos at once, they would all crawl at once, and you couldn't control them.
What I mean here is that during autotuning of the X axis, the other axes (Y and Z) running away (creeping) would cause an alarm (E-PID).
The E-PID alarm means exceeding the permissible position error (when the difference between the set position and the actual position is greater than the configured following position error).7) Set the initial value of the "steps per unit" parameters.
If you do not set these parameters, nothing bad will happen, but certainly, the distance at which autotuning will be performed will not be true.
You don't have to change the value of the parameters "velocity", "acceleration" and "jerk" at this stage because they are already factory-set to the initial value.
All the parameters mentioned in this point are used during autotuning.8) Run autotuning.
If you have kept all the above points, the autotuning will be successful.
During autotuning in the case of simCNC, the following parameters are set:
- PID loop parameters (kP and kI)
- feedforward velocity (kVff)
- feedforward acceleration (Kaff)
- analog output offset (Zero Offset)
- maximum following position error for the axis (Error Alarm Threshold).9) Repeat the above steps with the next axis.
10) Set the target value of "steps per unit", "velocity", "acceleration" and "jerk"
After a significant change in the "acceleration" and "jerk" parameters repeat the autotuning.
11) Set the number of pulses between the index signals in simCNC to protect homing on the index signal to work properly.
Servo drives have two electronic gears:
- for step/dir input
This gearing is important and only works when a servo drive is in position mode.
- for encoder output.
This gear always works, i.e., when the servo drive is in position, velocity and torque mode.
CSMIO/IP-A likes the high resolution of the encoder signal.
In the case of Mach3, the recommended number of pulses per one revolution of a servomotor is 10,000 (including all edges).
In the case of simCNC, a servomotor's recommended number of pulses per revolution is as much as 40,000 or even more (including all edges).
SimCNC's greater appetite for the number of pulses of the encoder signal results from its PID position regulators being twice as fast as for Mach3.
Twice as fast position PID regulator plus velocity and acceleration feedforward provide much more precise servo control.
For all this to make sense, servo drives must be correctly tuned (they must work stably and at the same time make the slightest speed error - speed deviation).
Running a machine equipped with CSMIO/IP-A is only a bit more difficult than a machine equipped with CSMIO/IP-S or CSMIO/IP-M.
The greater difficulty comes only from the greater number of connections (each encoder has 8 wires), the rest of the activities (e.g. configuration) are almost identical.
To have the CSMIO/IP-A running smoothly, you must act schematically, i.e. perform the activities in the right order.
This is because the CSMIO/IP-A works in a closed loop, it is a positional loop. When the position loop is open, i.e. the PID regulator is not tuned or the +/-10V signal or encoder signal is not connected, the servo drive is not controlled. In this situation, the servo drive can move at a low speed (creep).
Follow the procedure below and you will be a happy owner of a machine equipped with CSMIO/IP-A
1) Connect and configure E-stop signal.
2) Connect and configure the limit switches of all axes.
3) Connect all signals:
- DriveEnable
- Drive Fault (I always use the Servo Ready signal on the drive side because it clearly indicates whether the drive is ready for operation).
- Drive Reset
- encoder
- +/-10V
Drive Enable, Drive Fault, Drive Reset signals must also be set in simCNC MotinKit settings.
4) Check if the velocity and current loop in the servo drive are properly configured.
5) Check if the drive is configured to work with +/-10V signal.
The configuration should be such that at about +/-6V the drive reaches nominal speed.
The remaining 4V is for driving the drive (overloading the drive), it's normal and you can't be afraid of it.
6) If you are using a servo encoder output, check if it's set (if it is active and that the gear is electronically correctly set).
SimCNC likes a very high-resolution encoder signal.
The optimal value is 40,000 (counting the top 4 edges) pulses per 1 revolution of a servo drive.
Attention!
Only one servo drive for which the position PID loop has not been configured in the CSMIO/IP-A can be connected to the CSMIO/IP-A controller at a given moment
In the case of +/-10V analog control, there is such a thing as analog signal offset.
This offset causes a servo drive for which the position PID loop is not configured in simCNC (actually in CSMIO/IP-A) will creep (slow, uncontrolled movement).
If you connected all the servos at once, they would all crawl at once, and you couldn't control them.
What I mean here is that during autotuning of the X axis, the other axes (Y and Z) running away (creeping) would cause an alarm (E-PID).
The E-PID alarm means exceeding the permissible position error (when the difference between the set position and the actual position is greater than the configured following position error).
7) Set the initial value of the "steps per unit" parameters.
If you do not set these parameters, nothing bad will happen, but certainly, the distance at which autotuning will be performed will not be true.
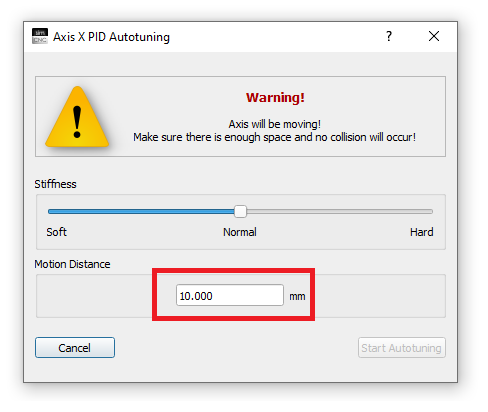
You don't have to change the value of the parameters "velocity", "acceleration" and "jerk" at this stage because they are already factory-set to the initial value.
All the parameters mentioned in this point are used during autotuning.
8) Run autotuning.
If you have kept all the above points, the autotuning will be successful.
During autotuning in the case of simCNC, the following parameters are set:
- PID loop parameters (kP and kI)
- feedforward velocity (kVff)
- feedforward acceleration (Kaff)
- analog output offset (Zero Offset)
- maximum following position error for the axis (Error Alarm Threshold).
9) Repeat the above steps with the next axis.
10) Set the target value of "steps per unit", "velocity", "acceleration" and "jerk"
After a significant change in the "acceleration" and "jerk" parameters repeat the autotuning.
11) Set the number of pulses between the index signals in simCNC to protect homing on the index signal to work properly.
Quote from Jugster on 27 January 2023, 14:28Everyone,
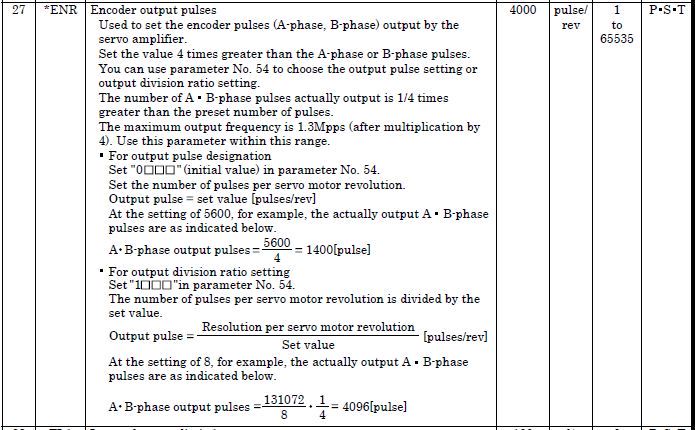
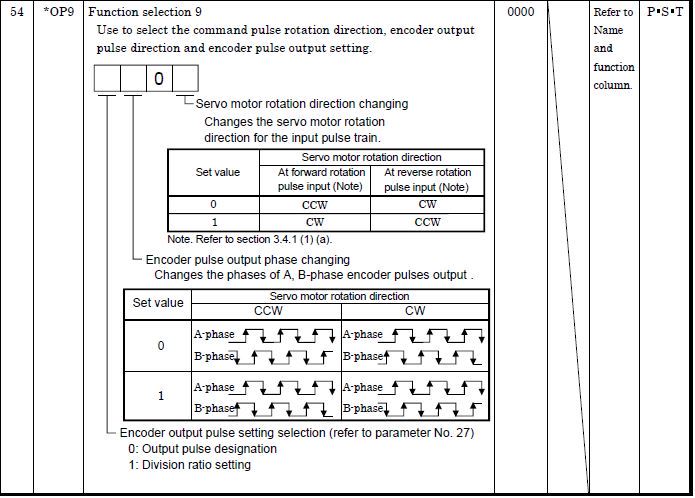
Attaching a few snippets for further explanation. Still testing but making some progress. So far the controller has been pretty straight forward. Parameter drives get a little complicated. Hope this helps someone with questions that they may have as well. I will keep updating.
Everyone,
Attaching a few snippets for further explanation. Still testing but making some progress. So far the controller has been pretty straight forward. Parameter drives get a little complicated. Hope this helps someone with questions that they may have as well. I will keep updating.
Uploaded files:Quote from Lason on 17 May 2023, 12:24I think it would be best to set up the control system according to the encoder pulses/rev. That should provide better accuracy and control.
I think it would be best to set up the control system according to the encoder pulses/rev. That should provide better accuracy and control.
Quote from axelbrooks on 17 May 2023, 15:21Are you looking to expand your social media presence? Learn about SMM Tribe, a completely automated social media marketing panel that offers premium services and boosts for your profiles and companies. Increase your online presence by gaining followers, likes, comments, views, and more on Instagram. Additionally, you may improve your presence on a variety of platforms, including LinkedIn, Spotify, Facebook, Twitter, Telegram, Facebook, TikTok, YouTube, and Facebook. SMM Tribe has you covered whether you're an influencer, a small business owner, or just trying to build your social media accounts. What's best? You can sit back and observe the growth of your social media presence as all services are entirely automated. Don't put off achieving your social media objectives any longer; join SMM Tribe right away and start getting results. https://smmtribe.com/ref/f2cdj.
Are you looking to expand your social media presence? Learn about SMM Tribe, a completely automated social media marketing panel that offers premium services and boosts for your profiles and companies. Increase your online presence by gaining followers, likes, comments, views, and more on Instagram. Additionally, you may improve your presence on a variety of platforms, including LinkedIn, Spotify, Facebook, Twitter, Telegram, Facebook, TikTok, YouTube, and Facebook. SMM Tribe has you covered whether you're an influencer, a small business owner, or just trying to build your social media accounts. What's best? You can sit back and observe the growth of your social media presence as all services are entirely automated. Don't put off achieving your social media objectives any longer; join SMM Tribe right away and start getting results. https://smmtribe.com/ref/f2cdj.


